Are you looking to automate the update of your linux servers?
By launching the updates concurrently?
Without having to use a sledgehammer to swat a fly?
Don’t look any further this tuto is made for you 😉.
Requirements
- 1000 servers to update (for example) :
- Having for hostname
serverXXXXX.localwithXXXXXranging from 00001 to 01000 - Using a linux distribution based on Debian (Debian, Ubuntu, Linux mint, …)
- Accessible via SSH on port 22 with the same private key and an
adminuseruser account that can runsudocommands without password prompt
- Having for hostname
- An instance of CTFreak (very easy to setup: no dependencies, no db to configure) with an administrator account, the Free Edition will be enough.
The script
On each server, this shell script will perform the update :
#!/bin/bash
export DEBIAN_FRONTEND=noninteractive
sudo apt update
sudo apt upgrade -y -o Dpkg::Options::="--force-confdef" -o Dpkg::Options::="--force-confold"
We find the classic apt update/upgrade enriched with some elements allowing to answer automatically any question likely to interrupt the script.
NB: If your servers are under Redhat (or any other distribution based on RPM), I invite you to adapt the script accordingly.
CTFreak
The next step will be to use ctfreak to deploy and run via SSH the script on our 1000 servers.
Login to ctfreak with your administrator account.
Adding the SSH Credential
Go to SSH Credential -> New SSH Credential button
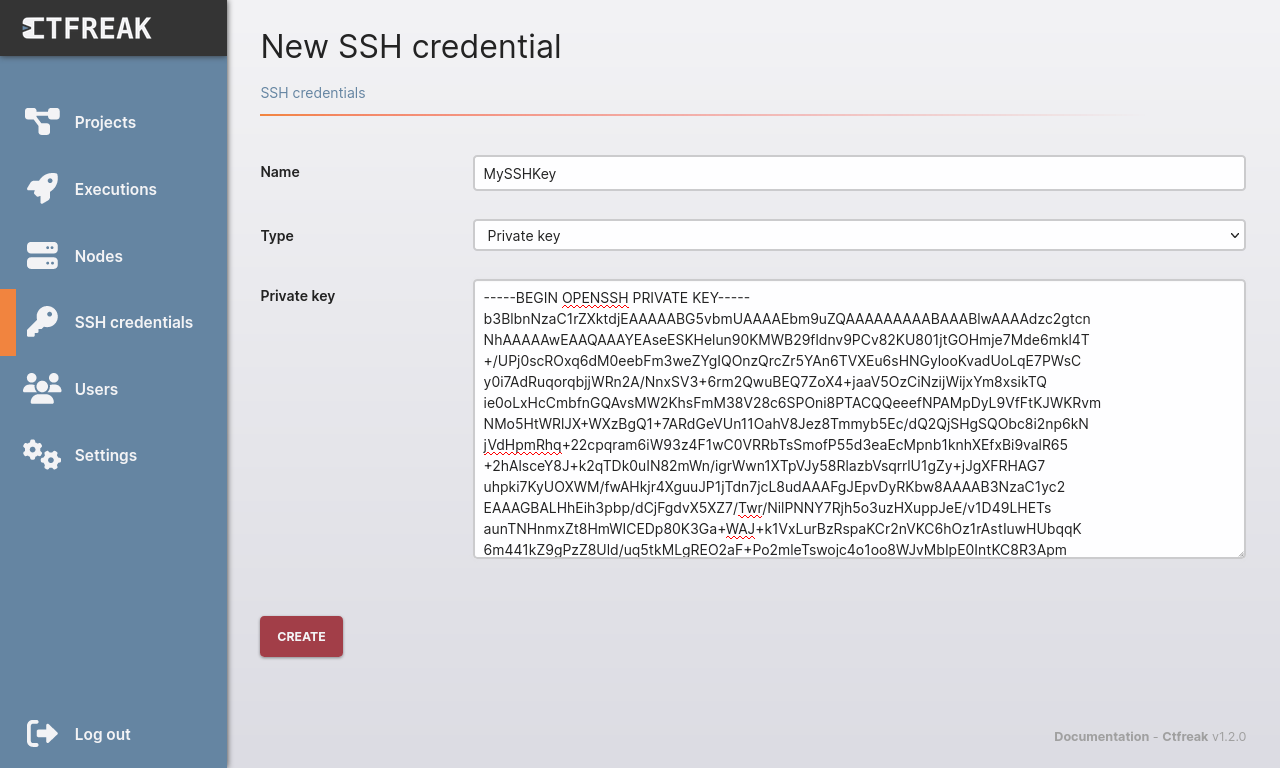
Add the SSH private key MySSHKey which allows to connect to the servers and validate.
NB : You can also connect with a password instead of a private key.
Adding nodes
A node defines the parameters for connecting to a server via SSH, the nodes are grouped in source nodes.
As a reminder, there are 1000 servers, so 1000 nodes to add.
It is actually possible to add the nodes one by one via the web interface, but in this case, you will rather create a dedicated source node which will be fed by a yaml file describing our 1000 nodes.
Let the file /home/adminuser/ctfreak-nodes.yaml (readable for the user running the ctfreak instance) :
- name: server0001
  tagNames:
    - debian_server
    - linux_server
  username: adminuser
  hostname: server0001.local
  osFamily: UNIX
  sshPort: 22

- name: server0002
  tagNames:
    - debian_server
    - linux_server
  username: adminuser
  hostname: server0002.local
  osFamily: UNIX
  sshPort: 22

## ...
## Complete with nodes 3 to 1000
## ...
Go to Nodes -> New External Node Source button
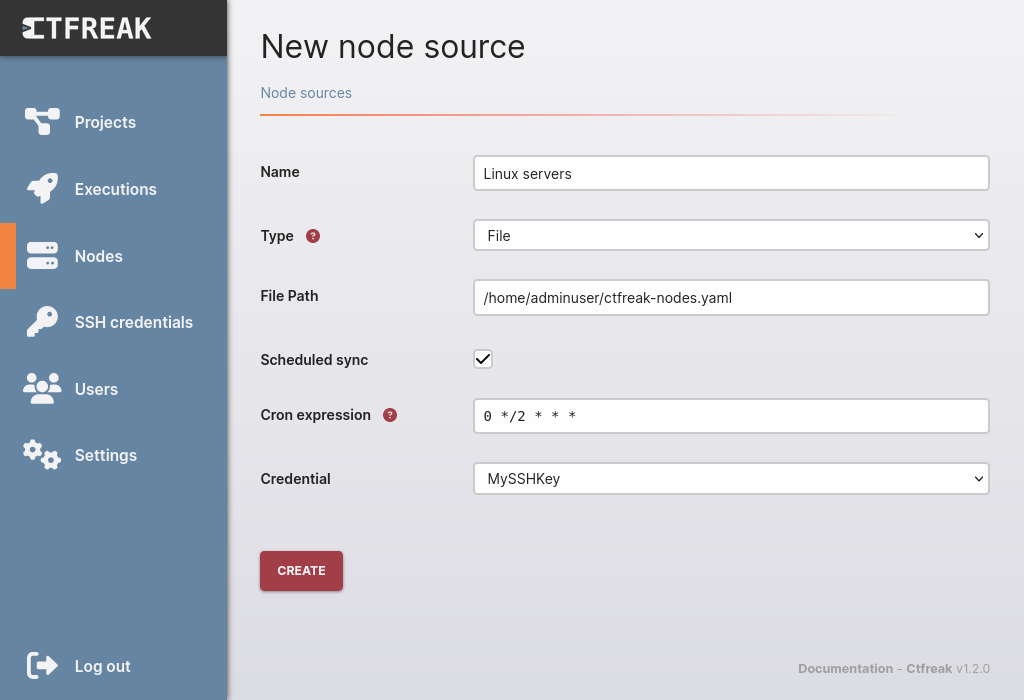
Check that the SSH key MySSHKey is selected as Credential (ctfreak will use it to connect to nodes via SSH), then validate to create the source node Linux Servers (this source node will resync its nodes from the yaml file every 2 hours).
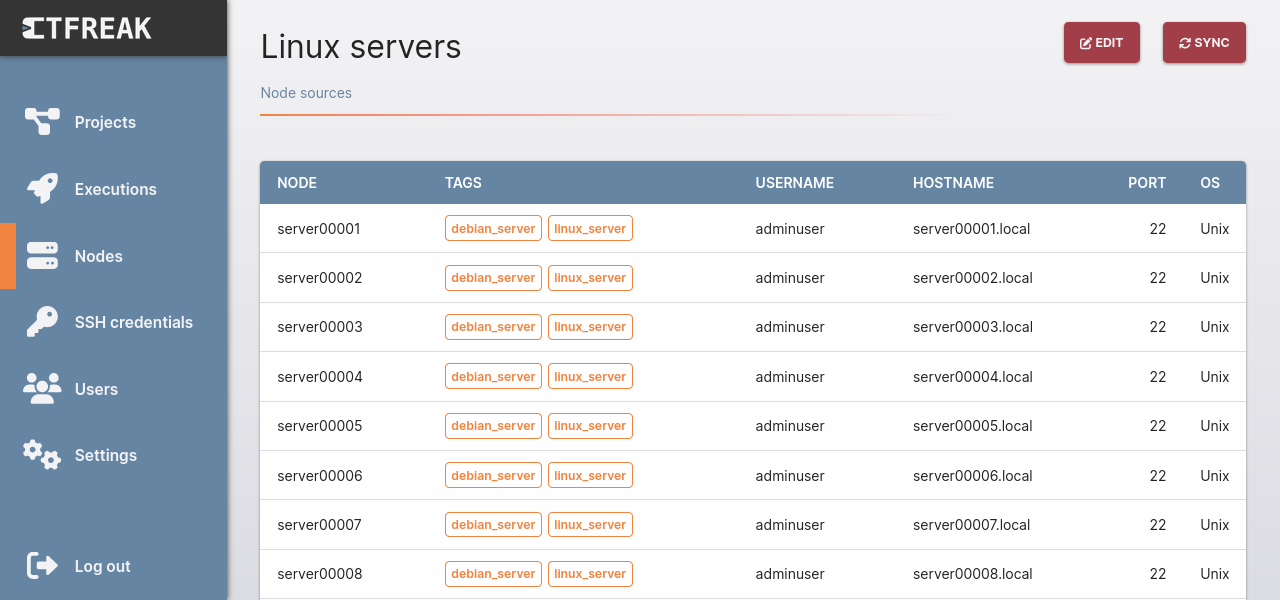
If the yaml file has been successfully processed, you should see the following list :
Adding the task
Go to Projects -> New Project button
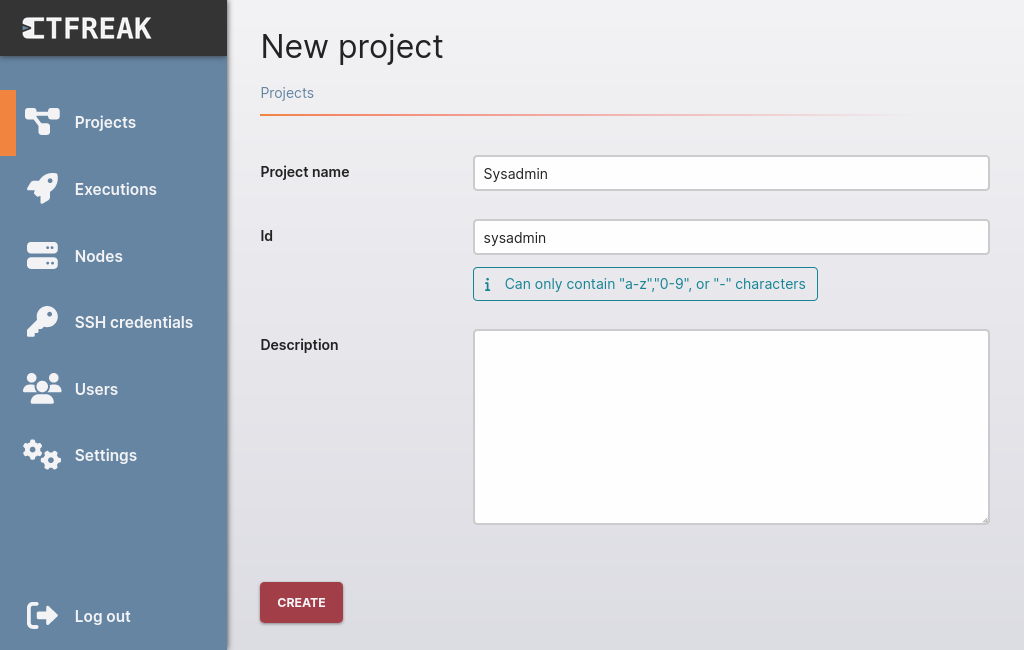
Validate to create the Sysadmin project.
Click on the New Task button.
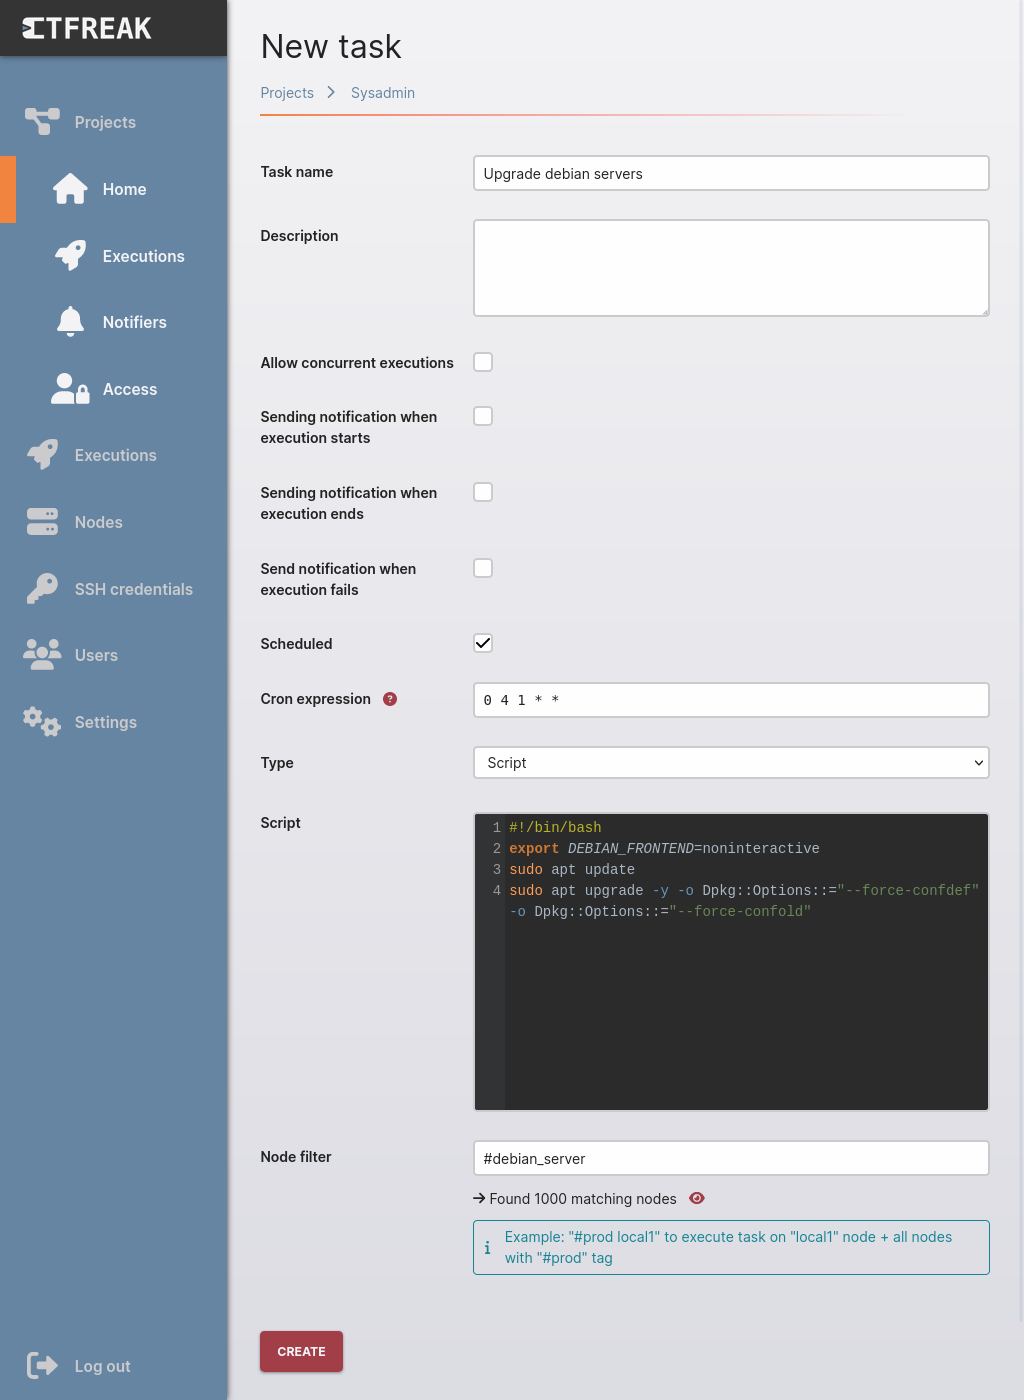
Validate to create the Upgrade debian servers task.
This task will deploy and execute the shell script :
- on all nodes matching the #debian_server tag
- every 1st day of the month at 4am
Execution of the task
To avoid waiting for the 1st of the month to see what happens 😉 , execute the task by clicking the Execute button.

The execution is launched, then click on the execution identifier #T0ZJX to see its progress for each node.
Once the execution is finished, some nodes may fail (timeout on SSH connection opening, package repository unavailable at the launch of apt-update, DNS issues, …) :
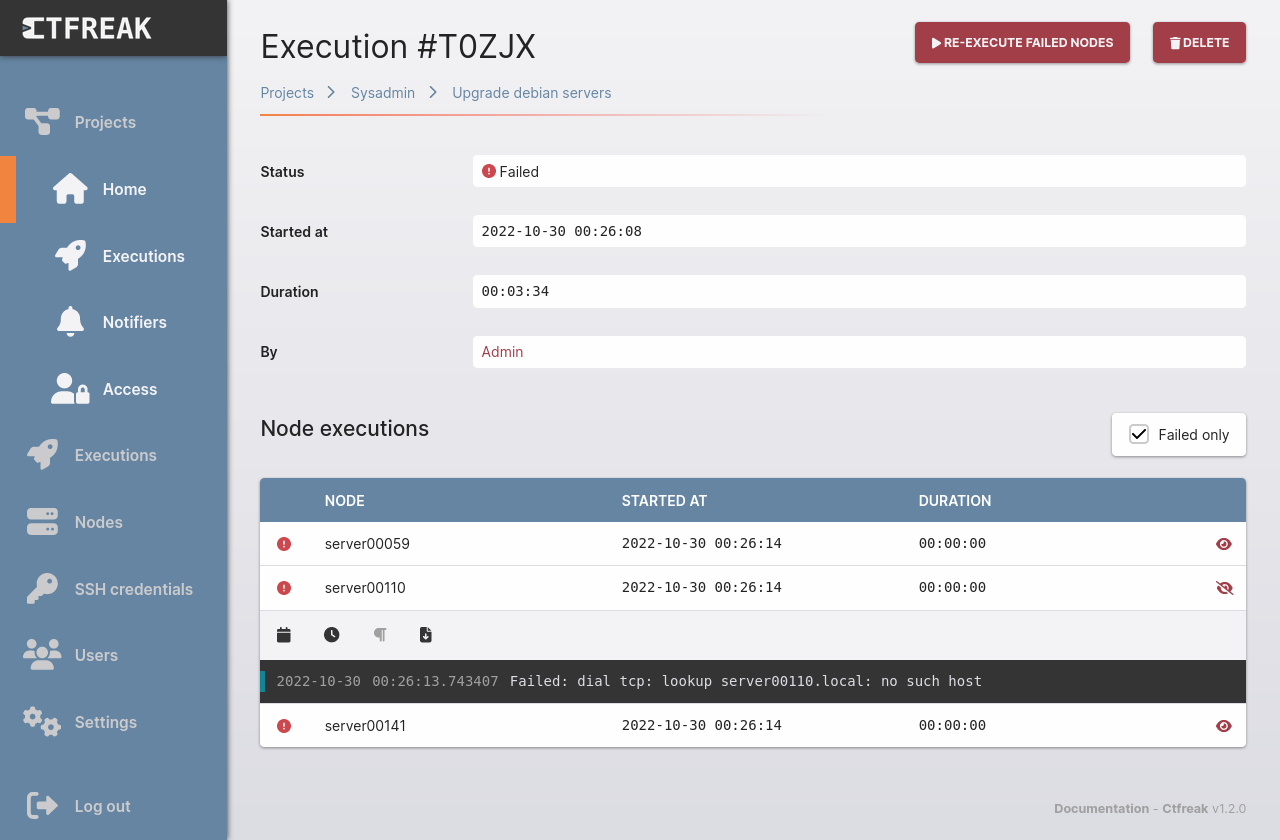
After checking the Failed only filter to only display failed nodes and check the logs to fix the issue (here a DNS problem), you can launch a new execution to process only failed nodes by clicking on Re-execute failed nodes.
Conclusion
Here you have a reliable process for updating your servers.
For those who would like to go further, here are some suggestions for improvement:
- Add an email notification in case of failed update.
- Add Redhat servers:
- Add 1000 new nodes with tags redhat_server, linux_server.
- Duplicate the Upgrade debian servers task to Upgrade redhat servers and adapt it accordingly.
- Create a Upgrade all servers task of type workflow to launch concurrently (PRO Edition) or sequentially (FREE Edition) the Upgrade debian servers and Upgrade redhat servers tasks.